What is the Front Rack?
The front rack is a stable position found at the start and end of many compound movement patterns, from front squats to the push press.
Getting into the position and being comfortable there requires a degree of mobility through various parts of the upper body and spine.
It’s common to have one or more restrictions that can make the front rack more difficult, so in this article we’ll take a look at the most common limitations and how to address them.
Broadly speaking, there are two main variations of the front rack:
1. Short Lever Front Rack
The bent arm front rack (our main focus in this article) is the stable position for the shoulder when carrying something at chest height or pressing something overhead.
We use it to initiate and complete many functional exercises, including front squats, cleans, overhead press, pull ups and handstand push ups.
2. Long Lever Front Rack
Extending the elbows from the short lever front rack brings us into the straight arm version, also known as the long lever.
This is a stable position for the shoulders when horizontally pushing (e.g at the top of a push up or bench press) or pulling (at the bottom of a ring row).
Front Rack Mechanics
The recipe for a solid short lever front rack setup with the barbell includes a few key ingredients:
Get tight through the core, feet hips width apart and facing forwards.
Unrack the bar with hands shoulder width or slightly wider.
Aim to get all fingers under the bar and the thumb gripping the opposite side.
Bar rests across the upper pecs, front delts and palm of hands.
Keep the chest lifted without flaring the ribs
Elbows are high, inside the hands and driving forwards.
Shoulders relaxed, not shrugged towards the ears.
Important:
Give the position a try with a broomstick or barbell before attempting the mobility exercises later in this article. In many cases, we see improvements in form by simply making a few tweaks to the setup.
If there’s still room for progress, take a photo or video, then compare your before and after.
Why is the Front Rack Important?
1. In the Gym
As touched on above, having the prerequisite mobility for the front rack means you can perform various compound movements safely and effectively, including but not limited to:
Holding a strong upright posture in front squats.
Receiving the barbell in a clean.
Supporting the bottom of an overhead press (albeit with the elbows lower).
Reaching the top of a pull up.
Controlling the bottom of a handstand push up.
Carrying kettlebells, a heavy medicine ball or an atlas stone at chest height.
Much like if you were to attempt to lift a heavy weight while standing in a wobbly rowing boat, if your front rack is unstable, it will be more difficult to generate force and benefit from many of the movements mentioned above - particularly front squats and cleans.
The good news is that you’ll likely find that if you can easily adopt the start and end position of a movement pattern, it’s then a case of simply connecting the dots to work through the full range of motion.
2. For Athletes
A solid front rack allows you to get the most out of big compound moves mentioned above, which means you’re getting your biggest bang for your buck when it comes to building muscle mass and increasing strength and power.
A good front rack also goes hand-in-hand with good shoulder mechanics, which can improve performance and potentially reduce injury risk in certain athletic movements such as carrying, throwing and striking [*].
3. In Everyday Life
Outside the gym, the front rack provides a stable platform for carrying heavy objects and lifting them overhead.
For ancestral humans, that might have been essential building materials or the rewards from a successful hunt. These days, we’re more likely to be lifting heavy shopping bags, furniture, and smaller family members.
As the front rack requires you to maintain an upright torso, it may also help reinforce a healthy standing posture.
How to Improve Front Rack Mobility With These 6 Drills
Now we understand why improving mobility for front rack exercises is important, it's time to try these six exercises to help you improve front rack mobility:
Three-Part Wrist & Elbow Extension
Banded Elbow Distraction
Thoracic Extension Over Roller
Overhead Banded Mobilisation
Dowel Shoulder External Rotation
Front Rack Banded Wall Slide
1. Three-Part Wrist & Elbow Extension
Areas targeted: Wrist flexors and extensors
A lack of wrist mobility is a common obstacle when it comes to the front rack. Specifically, reduced wrist extension makes it harder to grip the barbell comfortably and securely.
If during your setup you can only just about get a few fingers under the bar, or the bar is precariously resting in your fingers as opposed to the top of your palm, this drill is for you.
From a kneeling position, we’re going to move through three positions to open up the wrist flexors and extensors:
Palms down, fingers forward.
Palms down, fingers back.
Palms up, fingers back.
One repetition involves leaning your weight into your fingertips as you simultaneously straighten your arms.
Start slowly and gradually go deeper, performing 20 reps in each position along with an end range static stretch for 10-20 seconds.
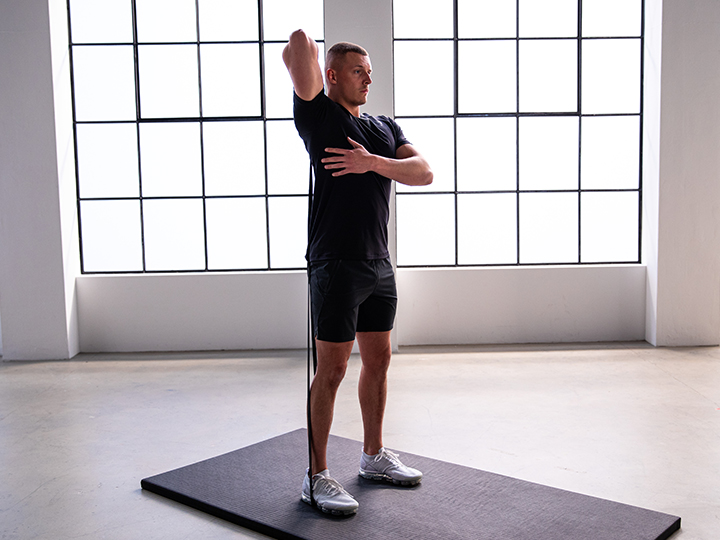
2. Banded Elbow Distraction
Areas targeted: Elbow joint, biceps, wrist flexors.
If we’re unable to fully flex at the elbow and close down the joint, it makes it difficult to adopt a solid front rack and can place unnecessary strain on the wrists.
Ideally, we’re aiming to get the first knuckle resting on the shoulders. For those with bigger biceps or thicker forearms this might be more of a struggle, but we can make up for that missing range by increasing external rotation at the shoulder (see drill 5).
Note that your range of motion may differ between your left and right sides. As a general rule of thumb, spend more time working on the more restricted area.
For this one, you’ll need access to a resistance band and an anchor point:
Tie a band to the anchor point around shin height.
Lie on your back and turn to your side slightly.
Place the band into the crook of the elbow closest to the floor.
With tension on the band, flex and extend at the elbow for 1-2 minutes per arm.
Use the other hand to manipulate your wrist into different positions which can completely change the dynamics of the mobilization.
3. Thoracic Extension Over Roller
Areas targeted: Thoracic spine.
Missing thoracic extension will make it difficult to keep the chest high in the front rack, shifting your weight forward and leading to rounding through the shoulders and mid-back.
If you’re stiff through the thoracic, grab a foam roller or two tennis balls taped together:
From your back, plant your feet and lie over the roller, starting with it at the base of your ribcage.
Slowly extend your spine over the roller, reaching your arms overhead if possible.
Perform for 10-20 repetitions, breathing freely, then shuffle the roller slightly up the spine.
Repeat until you reach the base of the neck.
4. Overhead Banded Mobilisation
Areas targeted: Lats, triceps, overhead mobility.
A decent degree of shoulder flexion is needed to help maintain high elbows in the front rack. Again, missing this range of motion will make it harder to adopt an upright starting position.
A common culprit is tightness through the lats, often accompanied by shoulders that round forwards. This drill targets the lats and helps open up through the triceps, further improving elbow flexion.
Again, grab a resistance band and get mobilizing:
Set up your band on an overhead anchor point (e.g pull up bar or squat rack).
Wrap your arm through the loop with your arm overhead, elbow bent and hand grabbing the outside of the band.
Keep the elbow in tight to your head and use your opposite hand to guide the elbow further back past your ear if available to you.
Keep your ribs down and experiment with different stances - split stance, front on, and leaning to one side to open up the side of the body.
Spend 1-2 minutes mobilizing per arm, feeling a nice stretch through the lats and triceps.
5. Dowel Shoulder External Rotation
Areas targeted: External rotators.
External rotation at the shoulder creates that sturdy platform in our front rack and helps to keep the rotator cuff safe.
We’re ideally aiming to get the hands slightly outside the elbows while still keeping the chest out and elbows lifted.
If that’s not available to you, the next drill will come in handy:
Grasp a dowel or broomstick in one hand in the front rack position - as if you're going to throw a javelin.
Reach for the long end of the stick with the opposite arm.
Use the bottom hand to gently oscillate your working arm between the start position and your end range of shoulder external rotation (wrist travels outside the shoulder).
Emphasis on gently - do not aggressively stretch the shoulder capsule.
Perform for 1-2 minutes per side.
6. Front Rack Banded Wall Slide
Areas targeted: External rotators, lats, serratus.
The wall slide is a great exercise that brings together a few of the things we’ve already worked on together - thoracic extension, shoulder flexion and external rotation.
We’ve worked on improving range of motion during the previous drills, and now we’re aiming to build strength through those ranges.
Face a wall with a light resistance band looped around your forearms, elbows bent at 90 degrees and forearms touching the wall.
Start with the forearms apart and wrists outside the shoulders, aiming to keep this position throughout.
Slowly slide the forearms up the wall, stopping when you can no longer maintain the position, then slowly reverse.
Perform repetitions for 1-2 minutes.
. . .
Author:
Luke Jones - Movement Coach and Content Creator at HERO Movement. Through articles, videos & online training, he explores and shares ideas in all things performance, well-being & adventure.
. . .
Sign up to the Gymshark Newsletter for the latest news!
